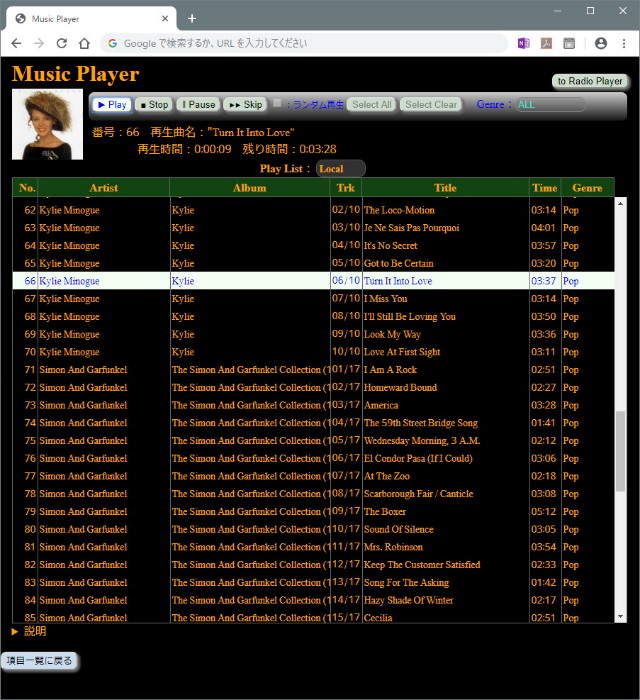
 Music Player画面 |
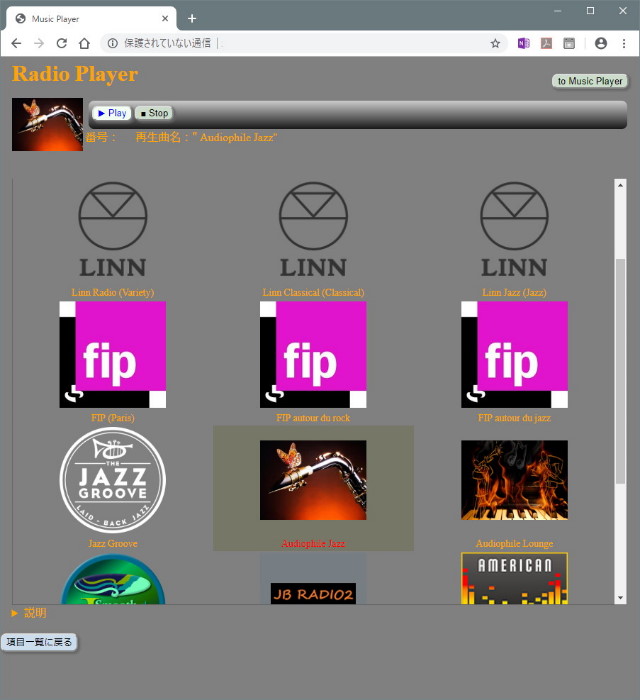 Radio Player画面 |
以前にraspi上の音楽プレーヤーをブラウザで操作するものをインターネットの情報を参考に作ったが、操作性が今一だったので、SQLite3を利用してもう少しそれっぽい音楽プレーヤーを作ってみた。また、SQLite3は利用しないがネットラジオのプレーヤーをOpenHome風に作った。
|
Music Player画面 |
Radio Player画面 |
●導入
SQLite3関連をraspi0の手順で導入。その他、pythonの下記モジュールを追加。
$sudo pip3 install mutagen ←音楽ファイルのタグ読み込み用
●pythonで音楽ファイルのDB作成
まずは、音楽フォルダから音楽ファイル一覧DBを作成するプログラムをpythonで作成。各アルバムフォルダ内のファイル情報をファイル名でソートしながらDB作成しているが、トラック番号(ファイル名先頭文字)"1"の次に"10"が来てしまう事象が有り、"1"の次に"2"が来るように一工夫が必要になった。
#!/usr/bin/python3
# -*- coding: utf-8 -*-
import os
import sqlite3
import glob
import mutagen
import tkinter
from tkinter import filedialog, simpledialog, messagebox
import re

cur_dir = os.getcwd()   # save current dir
root = tkinter.Tk()
root.withdraw()
iDir = os.path.abspath(os.path.dirname(__file__))
# 取り込む音楽フォルダの選択ダイアログを表示
mpath = filedialog.askdirectory(title = '音楽フォルダ選択', initialdir = '/')

# 指定フォルダ内音楽ファイルリストをアルバム内ファイル名でソートして作成
os.chdir(mpath)
flist = [p for p in sorted(glob.glob('**/*.*', recursive=True),
    key=lambda a: re.sub('([1-9])-','0\\1-',a ))	←file名ソートで"1"の次に"10"が来るのを防ぐ
    if re.search('.*\.(flac|m4a|mp3)',p)] # make file list
os.chdir(cur_dir)		# back to original dir
if(len(flist) == 0):	# 音楽ファイルが無かったら終了
    messagebox.showinfo(title="Info", message="音楽ファイルが有りませんでしたので、終了します。")
    exit()

# DBファイル指定ダイアログとテーブル名入力ダイアログの表示
if(messagebox.askyesno(title="確認", message="新規DBBファイル作成")):
    dbname = (filedialog.asksaveasfile(title = '新規DB名指定', filetypes=[('DB','*.sqlite3')], initialdir = iDir+'/db/')).name
else:
    dbname = filedialog.askopenfilename(title = 'DB名指定', filetypes=[('DB','*.sqlite3')], initialdir = iDir+'/db/')

tablename = simpledialog.askstring("DB Table Name","Table名を入力")

# DBを表すConnectionオブジェクトを作成して、DBに接続する。
conn = sqlite3.connect(dbname)
# DB上の処理対象の行を指し示すためのCursorオブジェクトを作成する。
cur = conn.cursor()

try:
    # 指定された名前のtableを作成する。
    cur.execute("DROP TABLE IF EXISTS " + tablename)
    cur.execute("""CREATE TABLE IF NOT EXISTS """ + tablename + """
      (id integer PRIMARY KEY NOT NULL
      ,artist char NOT NULL
      ,album char NOT NULL
      ,track char NOT NULL
      ,title char NOT NULL
      ,length char NOT NULL
      ,genre char NOT NULL
      ,fpath cahar UNIQUE NOT NULL
      );""")

    id = 0
    master=(id,'master','-','-','-','-','-',mpath)
    cur.execute('INSERT OR IGNORE INTO ' + tablename + ' VALUES (?,?,?,?,?,?,?,?);', master)
    for mfile in flist:
        a = mutagen.File(mpath+'/'+mfile, easy=True)	# 音楽ファイルのタグ情報を得る
        if( a == None): continue

        id=id+1
        tlength = str(int(a.info.length/60)).zfill(2)+':'+str(int(a.info.length%60)).zfill(2)
        mtag = (id,a['artist'][0],a['album'][0],a['tracknumber'][0],a['title'][0],tlength,a['genre'][0],mfile)
        # tableに各行のデータを挿入する。
        cur.execute('INSERT OR IGNORE INTO ' + tablename + ' VALUES (?,?,?,?,?,?,?,?);', mtag)

except sqlite3.Error as e:
    print('sqlite3.Error occurred:', e.args[0])

conn.commit()	# DBの変更を保存する。
conn.close()	# データベースとの接続を閉じる。
●ブラウザ側Music Playerページ
Music Playerのwebページは、PHP、HTMLとJavaScriptで作成し、主な内容は以下の通り。
<?php
/* Set POST query value or default settings */
$attr_genre   = ( isset( $_POST['genrelist']   ) ) ? $_POST['genrelist'] : "ALL";
$attr_playlist   = ( isset( $_POST['playlist']   ) ) ? $_POST['playlist'] : "";
$ini_file = "./tmp/sql-music.ini";

try{
    $db = new PDO('sqlite:./db/music.sqlite3');
    $tables = $db->query("SELECT name FROM sqlite_master WHERE type='table';");	// DBのtable一覧を得る
    $table_list = array();
    $aa = $tables->fetchAll(PDO::FETCH_ASSOC);
    foreach($aa as $tb){
        array_push($table_list, $tb['name']);	// table(playlist)名一覧データ
    }
    if($attr_playlist == ""){		// playlist変更要求でない場合
        if(file_exists($ini_file)){	// iniファイルから現行playlist名を得る
            $attr_playlist = (file($ini_file,FILE_IGNORE_NEW_LINES | FILE_SKIP_EMPTY_LINES))[0];
            if(!array_search($attr_playlist, $table_list)){
                $attr_playlist = $table_list[0];
            }
        }else{				// iniファイルが無い場合は初期値
            $attr_playlist = $table_list[0];
        }
    }
    file_put_contents($ini_file, $attr_playlist);

	// 指定ジャンルのデータを得る
    if($attr_genre != "ALL"){
        $musics = $db->prepare("SELECT * FROM ".$attr_playlist." WHERE genre = ?;");
        $musics->execute([$attr_genre]);
    } else {
        $musics = $db->prepare("SELECT * FROM ".$attr_playlist." WHERE id > 0 ;");
        $musics->execute();
    }
    $playlist = $musics->fetchAll(PDO::FETCH_ASSOC);    // 音楽一覧表作成時に使う

	// 選択table(playlist)内にあるジャンル種類一覧データを得る
    $genrelist = $db->query("SELECT DISTINCT genre FROM ".$attr_playlist.";")->fetchAll(PDO::FETCH_COLUMN);
    $p2j = json_encode($genrelist, JSON_UNESCAPED_UNICODE);

} catch (Exception $e) {

    echo $e->getMessage() . PHP_EOL;

}
$db = null;
?>
<div id='main'>
<h1 class="a1" style="display:inline;">Music Player</h1>
<div style="float:right;"><br><button onclick="location.href='./radio.php'">to Radio Player</button></div>

<div class='panel'>
    <div class='albumart'>		<!-- アルバムアート表示 -->
        <img id='album' src='./tmp/no-cover-art.jpg' width='100px' height='100px' alt='Album'>
    </div>
    <div style="display:inline-block;">
        <div class='console'>
            <div style="display:inline-block;">		<!-- スィッチ類表示 -->
                <button id="play" name="play" value="play">▶ Play</button>
                <button id="stop" name="stop" value="stop">■ Stop</button>
                <button id="pause" name="pause" value="pause">‖ Pause</button>
                <button id="skip" name="skip" value="skip"><span style="font-size:10px;">▶▶</span> Skip</button>
            </div>
            <div style="display:inline-block;">
                <input type="checkbox" name="random" value="random" id="random"><span style="font-size:12px;">:ランダム再生</span>
                <button id="selall" name="selall" value="selall">Select All</button>
                <button id="selclear" name="selclear" value="selclear">Select Clear</button>
            </div>
            <div style="display:inline-block;">		<!-- ジャンル選択用 -->
                 Genre:<select id="genrelist" name="genrelist"></select>
            </div>
        </div>
        <div class='monitor'>		<!-- 再生中曲情報 -->
            番号:<span id='number'>-</span> 再生曲名:"<span id='title'>Title</span>"<br>
                    再生時間:<span id='PlayTime1'>Play Time</span> 残り時間:<span id='PlayTime2'>Play Time</span>
        </div>
    </div>
</div>
<!-- Play List Table1 タイトル部分 -->
<div class="y_data_area">
    <table class="y_data_title">
    <caption>
        <strong>Play List</strong>:
        <select id="playlist" name="playlist">		<!-- playlist(table)選択 -->
        </select>
    </caption>
    <thead>
    <tr><th class='number'>No.</th><th class='artist'>Artist</th><th class='album'>Album</th><th class='track'>Trk</th><th class='title'>Title</th><th class='length'>Time</th><th class='genre'>Genre</th></tr>
    </thead>
    </table>
    <!-- Play List Table2 一覧データ(スクロール可能)部分 -->
    <div id="y_scroll_box" class="y_scroll_box">
        <div class="y_hidden">
            <table id="mtable" class="y_data">
                <tbody>
                <?php		//-- プレイリスト一覧作成 --
                    $cnt=0;
                    foreach($playlist as $m){
                        echo "<tr id='".$m['id']."'><td class='number'>".++$cnt.
                        "</td><td class='artist'><p title=\"".$m['artist']."\">".$m['artist']."</p>".
                        "</td><td class='album'><p title=\"".$m['album']."\">".$m['album']."</p>".
                        "</td><td class='track'>".$m['track'].
                        "</td><td class='title'><p title=\"".$m['title']."\">".$m['title']."</p>".
                        "</td><td class='length'>".$m['length'].
                        "</td><td class='genre'>".$m['genre']."</td></tr>\n";
                    }
                ?>
                </tbody>
                <tfoot>
                </tfoot>
            </table>
        </div>
    </div>
</div>
</div>
<script>
    // Genre Select options設定(ジャンルで一覧絞り込み用)
    var post = <?= json_encode($attr_genre); ?>    // activeにする項目情報を得る
    var arr = <?= $p2j; ?>     // 選択項目データ
    arr[0] = 'ALL';
    arr.forEach((val) => {
        let op = document.createElement("option");
        op.value = val;  // value値
        op.text = val;   // 表示用
        $('#genrelist').append(op); // <option value=xxx>xxx</option>の選択項目を追加
    });
    $('#genrelist').val(post);  // activeな選択項目を設定

    // Play List select options設定(DBテーブル(プレーリスト)選択用)
    var post_pl = <?= json_encode($attr_playlist); ?>    // activeにする項目情報を得る
    var arr = <?= json_encode($table_list); ?>     // 選択項目データ
    arr.forEach((val) => {
        let op = document.createElement("option");
        op.value = val;  // value値
        op.text = val;   // 表示用
        $('#playlist').append(op); // <option value=xxx>xxx</option>の選択項目を追加
    });
    $('#playlist').val(post_pl);  // activeな選択項目を設定
</script>
 :
 : 中略
    function table_scroll(id) {
        $('#mtable tr#'+id).addClass("active");

        var i = $('#mtable tr#'+id).index();
        var table = document.getElementById('mtable');
        var tbody = table.getElementsByTagName('tbody');
        var tr = tbody[0].getElementsByTagName('tr')[i];
        var scrollTo = tr.offsetTop;    // 指定行のtable上端からの位置
        var div_y = document.getElementById('y_scroll_box');
        div_y.scrollTop = scrollTo-21*5;
    }

    function post_ajax(reqdata) {
        $.ajax({	// raspiへコマンド送信
            url: linkurl,
            type: "POST",
            data: {'id':reqdata[0]},
            dataType: "json",
            timeout: 5000,
            beforeSend: function() {
                // 再生行の色を変えて、位置を見える所へスクロール
                if(!isNaN(reqdata[0])){
                    table_scroll(reqdata[0]);
                }
            },
            success: function (st) {
                console.log('success:'+st.status+':'+st.message);
                ajax_status = st.status;
                if(!isNaN(reqdata[0]) && st.status == 'success'){
                    document.getElementById("number").innerHTML = reqdata[3];
                    document.getElementById("title").innerHTML = reqdata[1];
                    if(timer != null) clearInterval(timer);
                    playTime(reqdata[2]);
                    timer = setInterval(timeCount, 1000);
                    onState = 'play';
  :
  : 中略
                }
            },
            error: function (st) {
 :
 : 中略
            },
            complete: function (st) {
                console.log('complete');
                if(!isNaN(reqdata[0])){
                    $.get('./tmp/album.jpg')
                        .done(function(){	// 再生アルバム画像表示
                            document.getElementById('album').src = './tmp/album.jpg?' + (new Date()).getTime();
                        })
                        .fail(function(){	// アルバム画像が無い場合はデフォルト画像表示
                            document.getElementById('album').src = './tmp/no-cover-art.jpg?' + (new Date()).getTime();
                        })
                }
            }
        });

    }

    var reqs = [];
    function run_list_ajax(){
        var ptime;
        var title;
		// 選択された曲情報集める
        $('table').find('tr.select').each(function(index,element){
            number = $('[id="'+element.id+'"]').children('.number')[0].textContent;
            title = $('[id="'+element.id+'"]').children('.title')[0].textContent;
            ptime = $('[id="'+element.id+'"]').children('.length')[0].textContent;
            reqs.push([element.id, title, ptime, number]);
        });
		// 最初の曲を再生
        if(randomPlay){
            randm = Math.floor(Math.random() * reqs.length);
            req = reqs[randm];
            reqs.splice(randm, 1);
            post_ajax(req);
        }else{
            post_ajax(reqs.shift());
        }
    }
 : 中略
 :
    $(document).on('click','#play',function(){	// Playボタンが押されたイベント処理
        console.log("play button:");
        swdisable(true);
        if(onState != 'play'){
            $('button').removeClass('active');
            $(this).addClass('active');
            if(onState == 'pause'){
                post_ajax(['play','','']);	// Pause中だった場合は再開始
            }else{
                run_list_ajax();			// 再生
            }
        }
    })
 : 以下略
●ブラウザ側Radio Playerページ
こちらはSQLiteを使用せず、ラジオ局一覧を書き込んだファイルの情報をHTMLページの<table>で表示している。
<?php
$conf_file = "radio.conf";		// 構成:title, Radio station URL, station rogo URL
$temp_conf = file($conf_file,FILE_IGNORE_NEW_LINES | FILE_SKIP_EMPTY_LINES);
$radio_conf = array();
$i = -1;
foreach($temp_conf as $a){
	if(preg_match('/^\[/', $a)){				// title line
		if($i != -1){array_push($radio_conf, $arr);}	// 中途のデータ保存
		$i = 0;
		$arr = array();
		$arr[0] = trim($a,'[radio]');

	}else if(preg_match('/^url/i', $a)){		// radio station address
		$i++;
		$arr[1] = substr($a,strpos($a,'http'));
	}else if(preg_match('/^arturl/i', $a)){		// radio station rogo
		$i++;
		$pos = strpos($a, 'http');
		if($pos !== false){
			$arr[2] = substr($a,strpos($a,'http'));
		}else{
			$arr[2] = ltrim($a, 'artUrl = ');
		}
	}
	if($i == 2){
		array_push($radio_conf, $arr);
		$i = -1;
	}
}
?>
<div class="y_data_area">
    <table class="y_data_title">
    <caption>
        <strong>Play List</strong>:
    </caption>
    <thead>
    </thead>
    </table>
    <div id="y_scroll_box" class="y_scroll_box">
        <div class="y_hidden">
            <table id="rtable" class="y_data">
                <tbody id="rd">
                <?php
                    $cnt=0;
                    for($i = 0; $i < count($radio_conf); $i++){	// 3列でアイコン表示
						echo "<tr>";
                        echo "<td><img src='".$radio_conf[$i][2]."' class='icon'><br>".$radio_conf[$i][0]."</td>";
                        $i++;
                        if($i >= count($radio_conf)){
							echo "</tr>\n";
							break;
						}
                        echo "<td><img src='".$radio_conf[$i][2]."' class='icon'><br>".$radio_conf[$i][0]."</td>";
                        $i++;
                        if($i >= count($radio_conf)){
							echo "</tr>\n";
							break;
						}
                        echo "<td><img src='".$radio_conf[$i][2]."' class='icon'><br>".$radio_conf[$i][0]."</td>";
                        echo "</tr>\n";
                    }
                ?>
                </tbody>
                <tfoot>
                </tfoot>
            </table>
        </div>
    </div>
</div>
    var radio_conf = <?= json_encode($radio_conf); ?>
    function radio(index){
        $('button').removeClass('active');
        $('#play').addClass('active');
        $.ajax({	// raspiへラジオ局URLを送る
            url: linkurl,
            type: "POST",
            data: {'id':radio_conf[index][1]},
            dataType: "json",
            timeout: 5000,
            beforeSend: function() {
            },
            success: function (st) {
                console.log('success:'+st.status+':'+st.message);
                onstate = 'play';
				document.getElementById("title").innerHTML = radio_conf[index][0];
            },
            error: function (st) {
                console.log('error:'+st.status+':'+st.message);
            },
            complete: function (st) {
                console.log('complete');
                document.getElementById('album').src = radio_conf[index][2]+'?' + (new Date()).getTime();
            }
        });

    }

    $(document).on('click','#rtable td',function(){	// iconクリックのイベント処理
		if($(this).text() == '') return false;
		$('#rtable td').siblings().removeClass("playing");
		$(this).toggleClass("playing", this.clicked);
		var td = $(this)[0].cellIndex;
		var tr = $(this).closest('tr')[0].rowIndex;
		var tds = document.getElementById('rtable').rows[0].cells.length;
		radio(tr * tds + td);	// tableの行と桁から選択ラジオ番号算出し送る
    });
●raspi側再生プレイヤー
raspi側では、YouTube playerで導入したmpvコマンドを利用して音楽再生を行う。
<?php
function playReq($req_id)
{
	if(is_numeric($req_id)){	// idが数値なら該当曲再生
		$fullpath = getMusicPath($req_id);

		# play中のものは中止して新たに再生
		if(!empty(exec('pgrep mpv'))){exec('sudo pkill -15 mpv');}
		exec('sudo -u pi rm ./tmp/album.jpg');
		if(strpos($fullpath,'.flac') !== false){
			$cmd = 'sudo -u pi metaflac "'.$fullpath.'" --export-picture-to=./tmp/album.jpg';
		}else{
			$cmd = 'sudo -u pi /usr/bin/ffmpeg  -i "'.$fullpath.'" -an -s 150x150 -scodec copy ./tmp/album.jpg';
		}
		exec($cmd . ' 2>&1', $array);
		$cmd = 'mpv --no-audio-display --quiet "' . $fullpath . '"';
		exec($cmd . ' > /dev/null &');
		$msg = '再生開始';
	}elseif(strpos($req_id,'http') !== false){	// URLならラジオ再生
		if(!empty(exec('pgrep mpv'))){exec('sudo pkill -15 mpv');}
		$cmd = 'mpv --no-audio-display --quiet "' . $req_id . '"';
		exec($cmd . ' > /dev/null &');
		$msg = 'RADIO開始';

	}elseif(!empty(exec('pgrep mpv'))){	// mpvが起動している
 :
 : 中略
 :
	}else{
		return 0;
	}
	return $msg;
}

function getMusicPath($id)
{
	$playlist = (file('./tmp/sql-music.ini', FILE_IGNORE_NEW_LINES | FILE_SKIP_EMPTY_LINES))[0];
	try{
		# sqlite3 DBアクセス
		$db = new PDO('sqlite:./db/music.sqlite3');
		# fetchモード設定
		$db->setAttribute(PDO::ATTR_DEFAULT_FETCH_MODE, PDO::FETCH_COLUMN);
		$sql = "SELECT fpath FROM ".$playlist." WHERE id IN (0,".$id.");";
		$mpath = $db->query($sql)->fetchAll();
		$fullpath = $mpath[0].'/'.$mpath[1];	# base-path + music-path
	} catch (Exception $e) {

		echo $e->getMessage() . PHP_EOL;

	}
	$db = null;
	return $fullpath;
}

$response = array();
if($_SERVER['REQUEST_METHOD'] == 'POST') {

  // always return true if you save the contact data ok or false if it fails
  $tmp = playReq($_POST['id']);
  $response['status'] = $tmp!==0 ? 'success' : 'AP error';
  $response['message'] = $response['status'] == 'success'
      ? $tmp
      : 'Your Requested ID:'.$_POST['id'].' is incorrect.';

  header('Content-type: application/json');
  echo json_encode($response);
  exit;
}
?>
【参考】